Friday, 29 December 2017

Natural numbers in Reverse order by VBscripting

Hello Friends,
in this, i am giving you code of VBScripting code for making reverse order of Natural numbers..
For using this code, Copy code from bellow attached then paste in Notepad and save it with extension *.vbs*.


//
dim num,n
n=inputbox ("Enter a value")
for num=n to 1 step -1
msgbox num
next

//

Download - Click Here

writing Natural number in text file by VBscripting

Hello Friends,
in this, i am giving you code for writing Natural number in text file by VBscripting .
For using this code, Copy code from bellow attached then paste in Notepad and save it with extension *.vbs*.


//
dim num,n,fso,myfile
n=inputbox("Enter the value")
num=1
for num=1 to n step 1
set fso=createobject("scripting.filesystemobject")
set myfile=fso.opentextfile ("D:\designtechacademy.txt",8,true)
myfile.writeline num
myfile.close
next

//

Download - Click Here

Find Even numbers upto n value by VBScripting.

Hello Friends,
in this, i am giving you code for Finding Even numbers upto n value by VBScripting.
For using this code, Copy code from bellow attached then paste in Notepad and save it with extension *.vbs*.


//
dim num,n
n=inputbox ("Enter a value")
for num=2 to n step 2
msgbox num

next

//


Download - Click Here

Find ODD numbers upto n value by VBScripting

Hello Friends,
in this, i am giving you code for Finding ODD numbers upto n value by VBScripting.
For using this code, Copy code from bellow attached then paste in Notepad and save it with extension *.vbs*.


//
dim num,n
n=inputbox ("Enter a value")
for num=1 to n step 2
msgbox num

next

//

Download - Click Here

Display reverse order from 4 digits number by vbscripting

Hello Friends,
in this, i am giving you code of VBScripting code for finding Reverse order from giving 4 digits numbers.
For using this code, Copy code from bellow attached then paste in Notepad and save it with extension *.vbs*.


//
dim num,rev
num=inputbox ("Enter a number")
if len(num)=4 then
rev=rev*10+num mod 10
num=num/10
num=left(num,3)
rev=rev*10+num mod 10
num=num/10
num=left(num,2)
rev=rev*10+num mod 10
num=num/10
num=left(num,1)
rev=rev*10+num mod 10
msgbox "Reverse order of the number is " &rev
else
msgbox "number, you entered is not 4 digit number"

end if

//

Download -  Click Here

How to find Leap year by VBScripting code

Hello Friends,
in this, i am giving you code of VBScripting code for finding Leap Year.
For using this code, Copy code from bellow attached then paste in Notepad and save it with extension *.vbs*.

//
dim xyear
xyear=inputbox ("Enter year")
if xyear mod 4=0 then
msgbox "This is a leap year"
else
msgbox "This is NOT leap year"

end if

//

Download Code -  Click Here

Thursday, 28 December 2017

Planar Surface: In SolidWorks


Hello friends,
In this topic,we will discuss about "Planar surface" command used in solidworks surface.
Planar surface used for making surface from boundary ( edges/ sketch).
Take it from.
Insert -> Surface -> Planar surface.
Or
Take it from Surface tab (pic1).

(A) Planar surface on sketch-
As shown below attached pic 1. We have a sketch which is closed and we required a surface by this sketch then we will use planar surface.
*Sketch must be close and that can be in any shape.


Select only sketch which you want to make a surface.


You can check by Below attached pic.
We got a surface from sketch by using planar surface.


(B) Planar surface by Edges-
We can use planar surface on edges to get a surface which will fill the surface.
Example in below attached pic.


We will get a surface by selection of edges which will boundary for planar surface.


Offset Surface : In SolidWorks


Hello friends,
In this post ,we will discuss about "Offset" command in Solidworks surface.
Offset surface used for making similar surface at a specific distance.
Take this command from.
Insert-> surface-> offset surface
Or
Take it from surface tab (pic 1).


Step 1-  we have a surface (pic2)
Then take command "offset surface".
And select it as shown in pic attached 2.

Step 2-> value for parallel distance.
Step 3-> direction for offset surface. (Pic2).


Select ok
Then you will get one more surface which will be on a specific distance. (Pic3)


Tuesday, 26 December 2017

Extend Surface: In SolidWorks


Hello friends,
In this post,we will discuss about "Extend surface" in Solidworks.

Go to-
 Insert-> Surface-> Extend.
Or
Surface tab-> extend Surface (pic1).

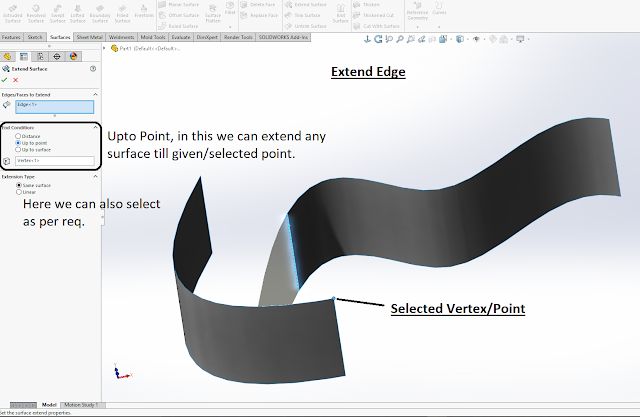
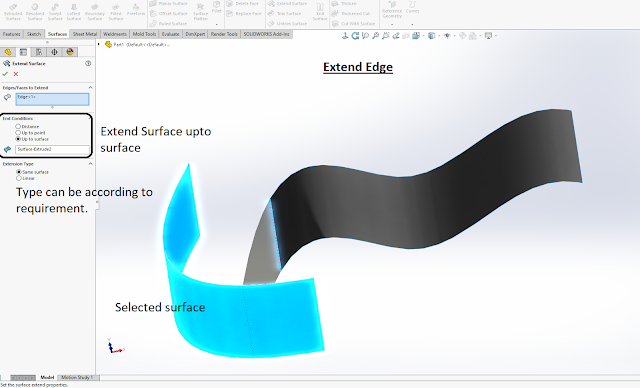
In this command you can extend Surface according to requirements (blind/upto vertex/upto surface..)

Ex- below attached pic have one surface.


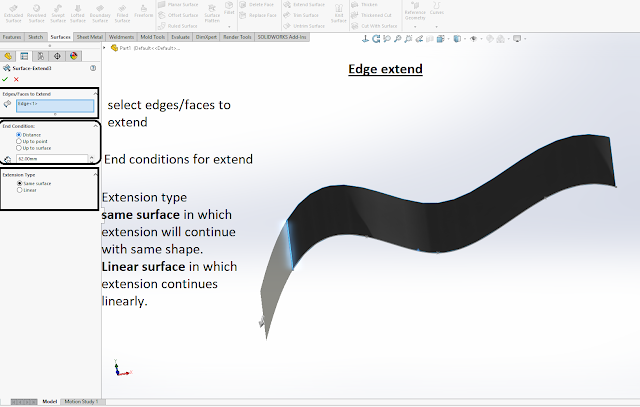
Take command "Extend surface" then you will get box in left side. Where
You can select edges/faces to extend.
End condition for extend limits.
(A) distance- extend distance value.
(B) up to point- surface will extend till given/selected point.
(C) up to surface- extend till given/selected surface.

Extension type-  way of extension
(A) Same surface- in this option new surface will follow the same curvature as selected surface.
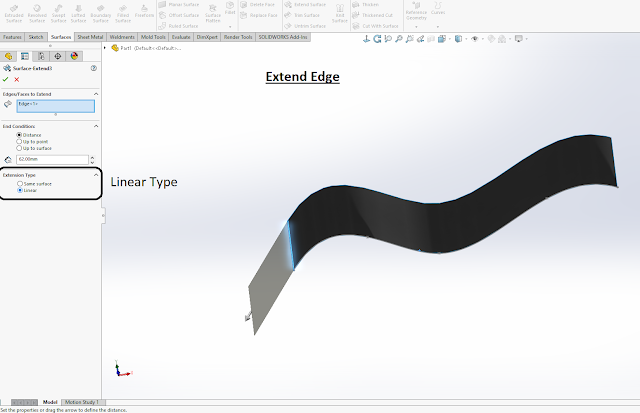
(B) linear - in this option, new surface will be linear direction.

By Edge selection
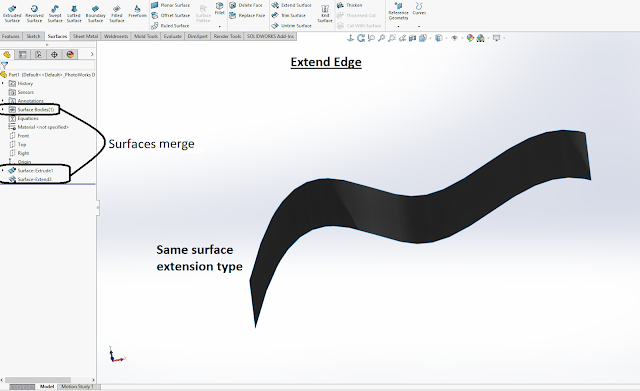
Fill all details with same surface.
As per below attached pic.


Made surfaces are merged now.


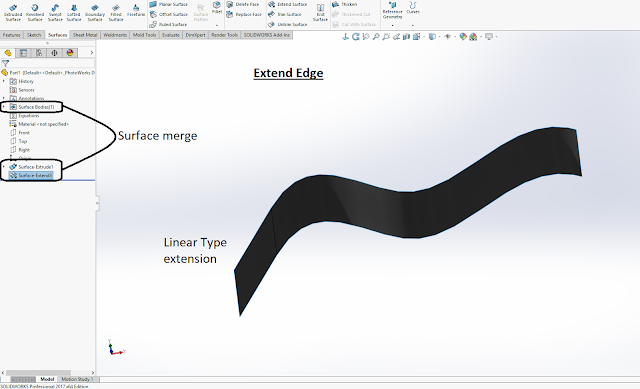
Filled all details with linear.
In Linear extension type ,new generation of surface will be linear direction.


Surface will form a single surface and both (new & old) surfaces will merge.


Upto vertex- in this end condition, we will give a vertex/point till surface will extend. And also can be linear or same surface.


Upto surface- in this end condition. Surface will extend till given surface.


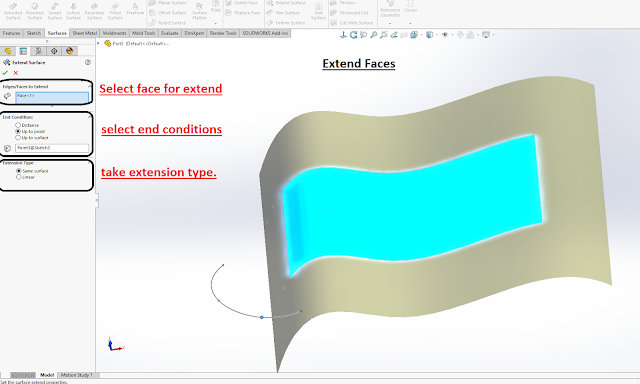
Extend Faces
In this, we will select face to extend except edges.
And in this surfaces will extend equally from all sides.

*End condition &. Extension type will be same as above mentioned.


Thursday, 21 December 2017

Surface Extrude in Solidworks

Hello friends,
Hope you all know about extrude tool in part/feature design where we create solids from sketch. Here we also use extrude surface tool in surface but not for making solids. Here we get surfaces.
Surface:- infinity thin

-> Extrude surface command can be used in two ways.
1st:- surfaces from sketch (extrude to sketch)
2nd:- surfaces from surfaces.

For surface extrude tool:- go in Insert-> surface -> extrude surface.
Or
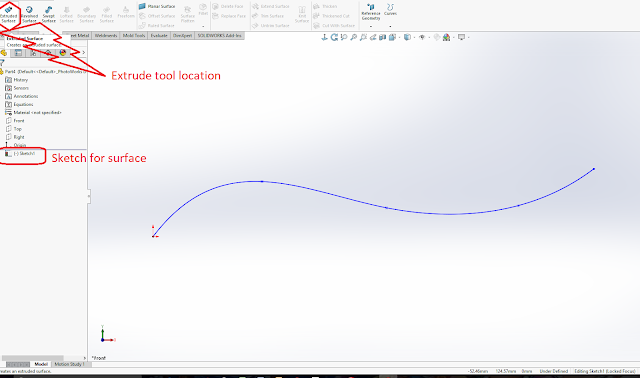
Surface  tab-> extruded surface. (Located in below Pic)

1st:- surfaces from sketch.

Here we have an example for understanding. In this we have a sketch for extrude. (Below Pic) 


After taking surface extruded command select sketch which you want to extrude (if you select command when you are still sketching mode then you don't require select sketch to extrude).

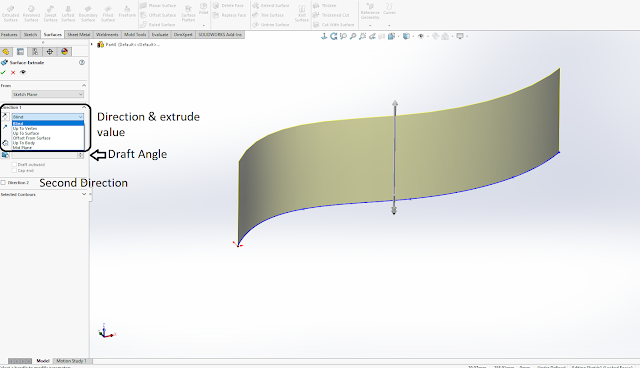
For extrude surface you can choose from where you want to extrude-
(1) Sketch plane- from same plane where you sketched.
(2) surface/face/plane- we can extrude from given surface/face/plane expect sketched plane.
(3) vertex - from given vertex/point.
(4) offset - offset from sketch plane (parallel distance from sketched plane).


Extrude direction-> Direction 1 & direction 2 used for directions and limit for extrude. Here we have options:-
(1) Blind - Normal direction & value for extrude.
In blind option we can change direction by giving any edge/sketch for direction selection.
(2)Up to vertex - extrude till any point/vertex. (No need to height value).
(3) Up to surface- extrude till any surface/face .(no need to give height value).
(4) offset from surface - extrude offset from any selected face/surface.(no need to give height but require offset value).
(5) up to body- extrude till any given body.
(6) Mid plane - extrude in both directions equally.


Draft angle is an inclination angle from it's axis.


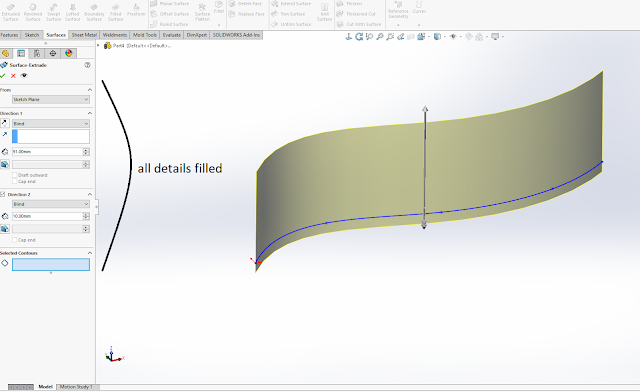
Fill all details as per your requirement (below mentioned pic).
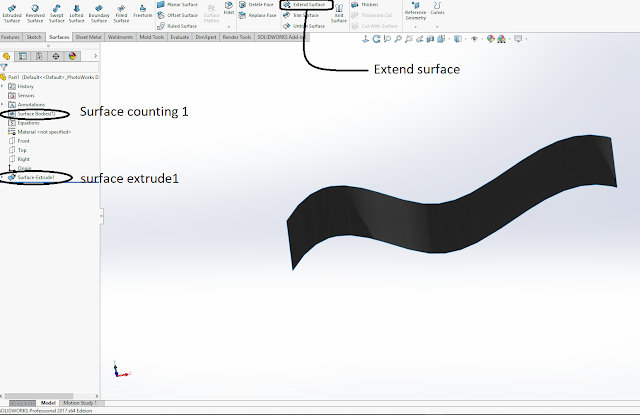
Then
Ok


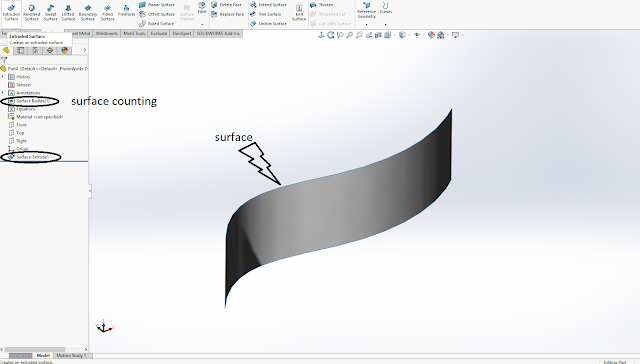
We can check by surface counting is one now and this surface body have infinity thin.


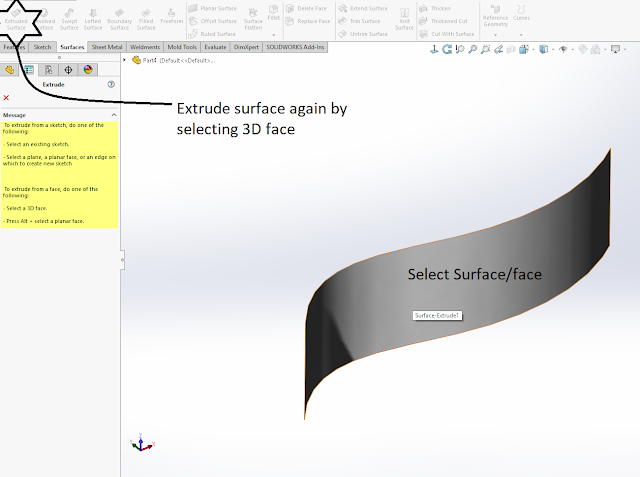
2nd- Surface from surfaces.


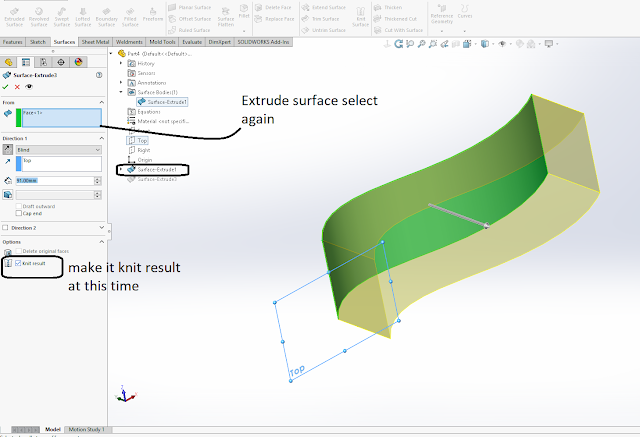
Take extrude surface command again.
&
Select face/surface on which you want to perform it.


After selecting the face/surface, then you will get same option like before you got.
But here you can create extrude surface from it's edges and normal to.
It can be both directions or single direction.
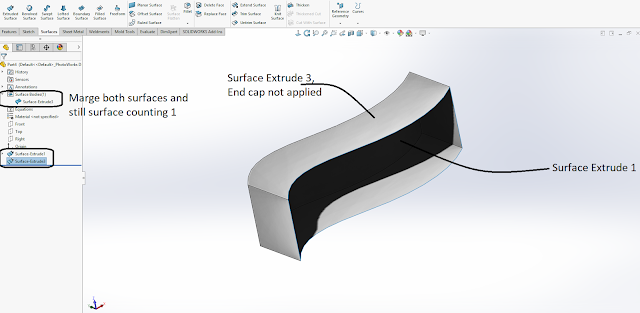
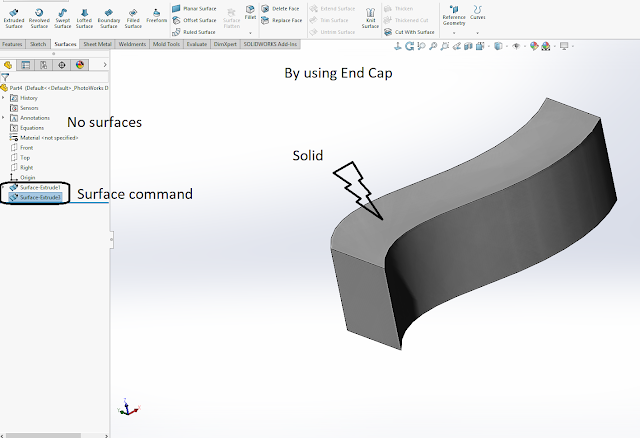
If you will select knit option & end cap.


Then you will find generated body is solid body. And first surface body still available as surface body.
*It generated by end option when we use extrude surface by surface.
*In this case, extrude direction in both side.


If end cap it applied & knit surface is applied then we get one surface only (due to knit). And opened from it's end side.


And again it we use end cap..then we can get one solid (no surface).
*In this case extrude direction is single only.


Wednesday, 20 December 2017

Revolve Surface: In SolidWorks


Hello friends,
In this post, we will discuss about revolve surface tool in Solidworks where it is as similar as feature revolve tool in solidworks and which may you also know another 3D Software as CATIA, UG ....etc then they also work similar.

For revolve surface in solidworks -> Insert -> surface -> revolve surface
Or
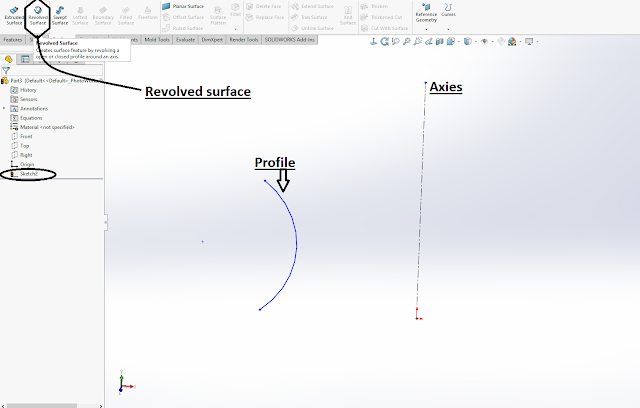
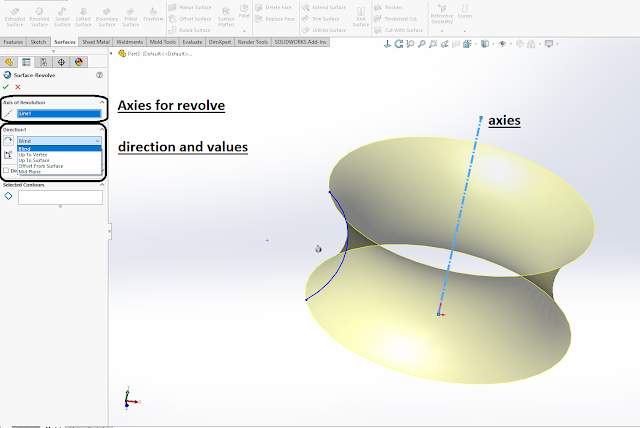
Surface tab -> revolve surface. (Location is in pic 1).
* If your surface tab is visible in tab list then make it visible by right click on any exciting tab then select from dial box.

*For revolve we must have an axis.

Step 1st-> make any open/closed profile which you want to revolve with an axis.
Refer pic 1.


Step 2nd-> select axis to revolve.
Step 3rd-> select direction and value to revolve.
Where
Blind- revolve till given value
Up to vertex- revolve till given vertex/point.
Upto surface- revolve till any selected surface.
Offset from surface- in this we can offset revolve from given surface/face.
Mid - value for revolve goes in both directions.

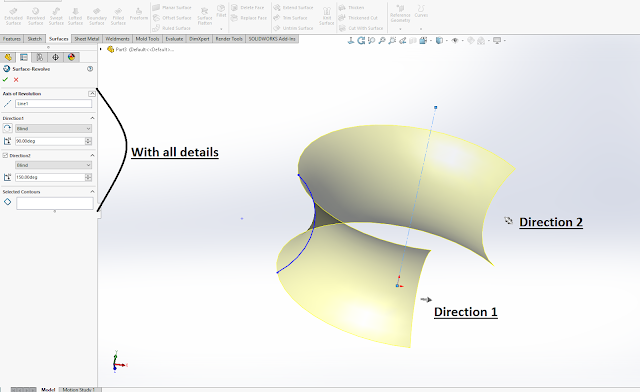
Step 4th- select Direction 2
Same as step 3rd but here it's in choice .


Refer below Pic where we apply details to get a revolve surface.


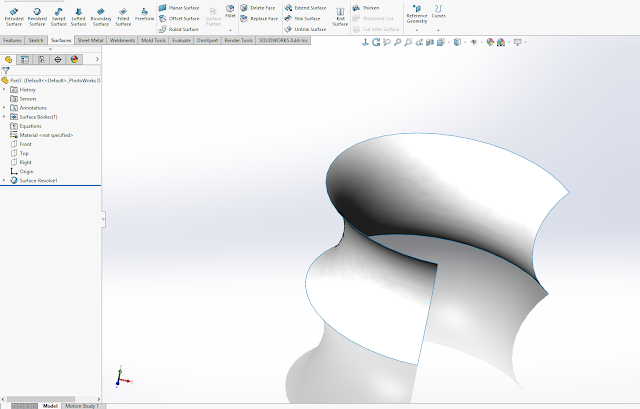
After selecting Ok. We will get revolved surface.


Wednesday, 13 December 2017

Solid Works Thicken & creating solid from enclosed volume in solidworks surfaces


Hello friends,
We all know about the surfaces and how to make surface based model so we have to use a tool (Thicken) in surfaces which provides thickness to surfaces for converting into solid body.
*Thicken can be used for providing thickness to surfaces.
*Thicken also can be used for solid from enclosed surfaces volume.
Both of things are mentioned below.

*1st - provide thickness.

Below attached sample pic have single surface . And also mentioned thicken tool to find it.


When we take thicken tool then we have to give surface on which we apply thickness.
And also thickness side- thickness side can be in 3 ways. (A) side 1    (B) Both side  (C) side 2

=> Side 1-  shown as in Pic, thickness will be in single direction (below side).


=>Side 2- thickness will be in single direction (upper side).


=>Both side- in this case , thickness will be in both directions (lower and upper side).


After apply thickness, It will be as below attached pic.


*2nd- Creating solid from enclosed volume.

we have a enclosed volume by surface (check in visualization tree).


We have a section view to check,its only by surfaces.


Take thicken command for convert solid from enclosed volume in solidworks.
#Select surface first then thickness side will be disabled and create solid option will come. Without selecting enclosed surface we will not able to view create solid option.

Select create solid from enclosed volume.
Then OK


Now we can check it by section view , which is created into solid from enclosed volume in solidworks surface.


Sunday, 10 December 2017

Water Calculation for Body According to Weight


How much water do you need a day?

Water is an important structural component of skin cartilage, tissues and organs. For human beings, every part of the body is dependent on water. 
The average adult loses about 2.5 litres water daily through perspiration, breathing and elimination. Symptoms of the body's deterioration begins to appear when the body loses 5% of its total water volume. In a healthy adult, this is seen as fatigue and general discomfort, whereas for an infant, it can be dehydrating. In an elderly person, a 5% water loss causes the body chemistry to become abnormal, especially if the percentage of electrolytes is overbalanced with sodium.One can usually see symptoms of aging, such as wrinkles, lethargy and even disorientation. Continuous water loss over time will speed up aging as well as increase risks of diseases.
If your body is not sufficiently hydrated, the cells will draw water from your bloodstream, which will make your heart work harder. At the same time, the kidneys cannot purify blood effectively. When this happens, some of the kidney's workload is passed on to the liver and other organs, which may cause them to be severely stressed. Additionally, you may develop a number of minor health conditions such as constipation, dry and itchy skin, acne, nosebleeds, urinary tract infection, coughs, sneezing, sinus pressure, and headaches.
So, how much water is enough for you? The minimum amount of water you need depends on your body weight. A more accurate calculation, is to drink an ounce of water for every two pounds of body weight.
Here is the calculation for your minimum water need per day
*Your weight = W
=((W*2.2)/2/15)*450 ml
=((((W*2.2)/2/15)*450)/1000) liters


VBScript Code for calculations.
var1=cdbl(inputbox("Enter the Weight"))
msgbox "Water required in ml=" & (((var1*2.2)/2/15)*450)      & "  water required in liters =" & ((((var1*2.2)/2/15)*450)/1000)


Download VBScript - Click Here

Sunday, 3 December 2017

Important HR round questions

Hello friends,
As we all know process of hiring in any company in which interview is the most important part of hiring process in all company (MNC, Pvt LTD...etc). Interview could be in many rounds.
Like- 
Test/ Exam
Technical round
HR round

Above mentioned round have there own values and also have a broad area but in specific field we face same type of questions, from all these some important questions are mentioned below for HR round.

1. Tell me about yourself.

2. Why do you want to work at our company?

3. Why should I hire you?

4. What is the difference between hard work and smart work?

5. Are you a risk taker or do you like to stay away from risks?


6. What are your strengths and weaknesses?

7. Can you work under pressure?

8. What motivates you to do good job?

9. How long would you expect to work for us if hired?


10. Have you managed people in any of the positions you’ve held?


11. How do you balance both your family and your job?

12. If you're told by your boss to do something that you feel is illegal, what would you do?

13. How do you define success?

14. What will you do when you have a problem with your boss?


15. Is the salary $XXXX good for you per month or How much salary do you expect?


16.Where do you see yourself five years from now?

17.  What is the difference between confidence and over confidence?

18.  How do you feel about working nights and weekends ?


19.  May I contact your present employer for a reference ?


20.  How do you feel about reporting to a younger person ?

21. Don’t you think, you are overqualified for this position?

22. I see, there’s some gap in your work history. Why?

23. Is there anything that you do not like about your last or current job?

24. How long can you commit to work with us?


25. You seem to be drawing a good salary. Will you be OK in taking a salary cut?

26. What is your expected salary?

27. Why do you consider yourself a suitable candidate for this position?

28. What do you know about us?

29. What do you do to improve your knowledge?

30. How do you rate your communication skills?

31. Why should we hire you?

32. Can you describe environment of your current /last company?

33. If you could do anything, what would be your ideal job?

34. What is your work style?

35. Do you have any questions for me?